안녕하세요~
CSS 초보자입니다....^^
CSS를 이용한 DIV 레이아웃과 관련하여 2가지 문의를 드려봅니다.
아래 소스로 레이아웃을 잡았습니다.
--------------------------------------------------------------------------
<!DOCTYPE html PUBLIC "-//W3C//DTD XHTML 1.0 Transitional//EN" "http://www.w3.org/TR/xhtml1/DTD/xhtml1-transitional.dtd">
<html xmlns="http://www.w3.org/1999/xhtml">
<head>
<title>div 태그로 레이아웃 설정</title>
<style type="text/css">
body { text-align:center; width:100%; height:100%;}
#header {
width:990px; height:100px; background-color:Yellow; border:groove 1px silver;
padding:0px 0px 0px 0px; margin:0px 0px 10px 0px;}
#left{
width:160px; height:200px; background-color:Yellow; border:groove 1px silver;
padding:0px 0px 0px 0px; margin:0px 10px 0px 0px;
float:left;}
#content{
width:650px; height:200px; background-color:Yellow; border:groove 1px silver;
padding:0px 0px 0px 0px; margin:0px 0px 0px 0px;
float:left;}
#right{
width:160px; height:200px; background-color:Yellow; border:groove 1px silver;
padding:0px 0px 0px 0px; margin:0px 0px 0px 10px;
float:left;}
#footer{
width:990px; height:100px; background-color:Yellow; border:groove 1px silver;
padding:0px 0px 0px 0px; margin:10px 0px 0px 0px;
float:left;}
</style>
</head>
<body leftmargin="3" marginwidth="3" topmargin="3" marginheight="3">
<div id="header">Navigator</div>
<div style="width:990px;">
<div id="left">Left</div>
<div id="content">Content</div>
<div id="right">Right</div>
<div id="footer">Footer</div>
</div>
</body>
</html>
-----------------------------------------------------------------
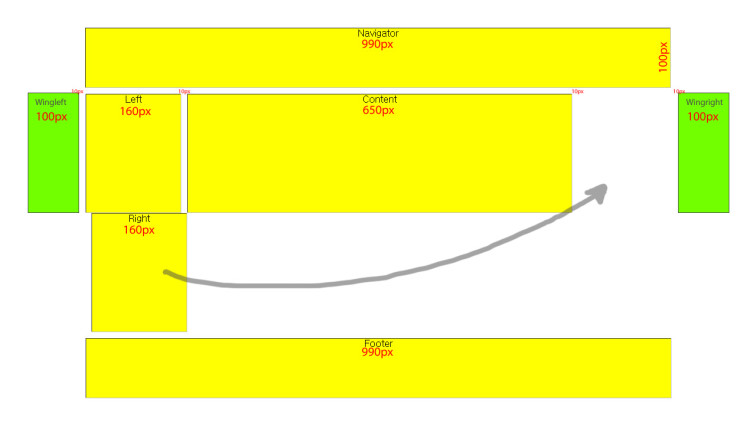
<궁금증 1>
첨부한 그림에서 보시다시파 "Right" 칸이 아래로 밀려납니다.... ㅡ.ㅡ;;
무엇이 잘못되었는지, 어느 부분을 수정하면 되는지 도움 말씀 부탁드립니다.
<궁금증 2>
첨부한 그림에서 보시면 좌측, 우측에 보시면 파란색 박스로 배너를 달려고 합니다.
인터넷 검색해서 비슷한 유형의 소스들을 퍼다가 붙혀 보았는데... 내공부족으로 안됩니다.... ㅠ.ㅠ
위 소스를 어떻게 구현하면 되는지... 함께 도움 말씀 부탁드립니다~
이곳 부산에는 이제 벛꽃망울둘이 제법 커졌습니다.
다음주면 활짝 만개를 할것 같군요.
주말에 봄내음 맏으면서 즐거운 시간 보내시기 바랍니다.
감사합니다~
2012.4.6
부산에서 SIR 사용자 드림

댓글 13개
일단 div 는 테이블이 아닙니다. div 는 division 의 약자 입니다. 이렇게 생각하시면 쉬워요.
종이가 한장 있습니다. 그 종이를 여러 조각으로 나누는 겁니다. 저 위의 그림은 종이의 넓이가 990 인데 어떻게 divide 하면 100, 160, 650, 100 으로 나눌수 있을까요?
불가능한거죠. 제일 상단의 div 가 100, 160, 650, 100 을 합한 수 보다 더 넓어야 하는겁니다.
그리고 저 위의 레이아웃은 이렇게 짜면 되겠죠.
<style>
.최신글 { padding: 20px;border: 1px solid grey; float: left}
#최신글1 { width:100px;background-color:yellow;}
#최신글2 { width: 100px;background-color:red;}
#최신글3 { width: 100px;background-color:orange;}
#최신글4 { width: 100px;background-color:green;}
.위아래 { width: 500px; background-color:blue;}
}
</style>
<div class="위아래">header</div>
<div id="최신글1" class="최신글">1 </div>
<div id="최신글2" class="최신글">2</div>
<div id="최신글3" class="최신글">3</div>
<div id="최신글4" class="최신글">4</div>
<div class="위아래">footer</div>
확인 안해봤는데, 아마 맞을거에요.

일하는 중이라 간단하게 수정해봤습니다.
익스9에서만 테스트해봤습니다.
<!DOCTYPE html PUBLIC "-//W3C//DTD XHTML 1.0 Transitional//EN" "http://www.w3.org/TR/xhtml1/DTD/xhtml1-transitional.dtd">
<html xmlns="http://www.w3.org/1999/xhtml">
<head>
<title>div 태그로 레이아웃 설정</title>
<style type="text/css">
body { text-align:center; margin:0; padding:0; width:100%; height:100%;}
#wrapper {
margin:0 auto; width:1210px;
}
#wingleft {
float:left; margin-top:110px; margin-right:10px; width:100px; height:100px; border:1px solid silver; background:yellow;
}
#wingright {
float:right; margin-top:110px; width:100px; height:100px; border:1px solid silver; background:yellow;
}
#wrapperb {
float:left; margin:0 auto; width: 990px;
}
#header {
width:990px; height:100px; background-color:Yellow; border:groove 1px silver;
padding:0px 0px 0px 0px; margin:0px auto 10px;}
#left{
width:160px; height:200px; background-color:Yellow; border:groove 1px silver;
padding:0px 0px 0px 0px; margin:0px 10px 0px 0px;
float:left;}
#content{
width:650px; height:200px; background-color:Yellow; border:groove 1px silver;
padding:0px 0px 0px 0px; margin:0px 0px 0px 0px;
float:left;}
#right{
width:160px; height:200px; background-color:Yellow; border:groove 1px silver;
padding:0px 0px 0px 0px; float:right;}
#footer{
width:990px; height:100px; background-color:Yellow; border:groove 1px silver;
padding:0px 0px 0px 0px; margin:10px 0px 0px 0px;
float:left;}
</style>
</head>
<body>
<div id="wrapper">
<div id="wingleft">wingleft</div>
<div id="wrapperb">
<div id="header">Navigator</div>
<div style="float:left;width:990px;">
<div id="left">Left</div>
<div id="content">Content</div>
<div id="right">Right</div>
<div id="footer">Footer</div>
</div>
</div>
<div id="wingright">wingright</div>
</div>
</body>
</html>
<!DOCTYPE html PUBLIC "-//W3C//DTD XHTML 1.0 Transitional//EN" "http://www.w3.org/TR/xhtml1/DTD/xhtml1-transitional.dtd">
<html xmlns="http://www.w3.org/1999/xhtml">
<head>
<title>div 태그로 레이아웃 설정</title>
<style type="text/css">
body { text-align:center; width:100%; height:100%;}
#header {
width:994px; height:100px; background-color:Yellow;border:groove 1px silver;
padding:0px 0px 0px 0px; margin:0px 0px 10px 0px;}
#left{
width:160px; height:200px; background-color:Yellow;border:groove 1px silver;
padding:0px 0px 0px 0px; margin:0px 10px 0px 0px;
float:left;}
#content{
width:650px; height:200px; background-color:Yellow;border:groove 1px silver;
padding:0px 0px 0px 0px; margin:0px 0px 0px 0px;
float:left;}
#right{
width:160px; height:200px; background-color:Yellow;border:groove 1px silver;
padding:0px 0px 0px 0px; margin:0px 0px 0px 10px;
float:left;}
#footer{
width:994px; height:100px; background-color:Yellow;border:groove 1px silver;
padding:0px 0px 0px 0px; margin:10px 0px 0px 0px;
float:left;}
</style>
</head>
<body leftmargin="3" marginwidth="3" topmargin="3" marginheight="3">
<div id="header">Navigator</div>
<div style="width:996px;">
<div id="left">Left</div>
<div id="content">Content</div>
<div id="right">Right</div>
<div id="footer">Footer</div>
</div>
</body>
</html>
* 아래의 설명은 표준 브라우저를 기준으로 작성함을 알려드립니다.
* 오류없이 작성하려 꽤 노력은 하였지만 혹시라도 작성에 오류가 있다면 알려주시기 바랍니다.
* 설명에 관한 궁금증 및 오류의 지적은 댓글 또는 쪽지로 남겨주시면 참고하여 수정하겠습니다.
<궁금증 1에 대한 답>
1. #header {width:990px; height:100px; background-color:Yellow; border:groove 1px silver; padding:0px 0px 0px 0px; margin:0px 0px 10px 0px;}
- 위의 헤더 소스를 보면 박스 너비가 990px, 높이가 100px, 테두리 (상,하,좌,우) 선의 굵기가 1픽셀입니다.
- 위의 소스는 테두리를 뺀 크기가 너비 990px, 높이가 100px 이라는 뜻이며,
- 1px의 테두리를 그렸다면 실제 너비는 992px, 높이가 102px 이라는 뜻입니다.
2. 그런데 블랙님의 소스를 해석해보면
- #header 의 크기는 테두리 선을 포함하여 너비 992px, 높이 202px 이며
- #left 의 크기는 테두리 선을 포함하여 너비 162px, 높이 202px
- #content 의 크기는 테두리 선을 포함하여 너비 652px, 높이 202px
- #right 의 크기는 테두리 선을 포함하여 너비 162px, 높이 202px 입니다.
3. 여기에서 header의 너비 992px 이며 그 아래에 일렬로 배치하려는 left + content + right 의 너비 합은 976px 이며
left 와 content 사이에 10px의 공간(margin 값)을 주었고, content 와 right 사이에 10px의 공간(margin 값)을 준다면
left, content, right 가 배열되면 실제 너비 (가로) 가 996px 이 됩니다.
4. 그래서 아래와 같이 소스의 수정이 필요합니다. (위의 '아이존' 님의 설명과 같습니다.)
- 수정부분 1 : header 와 footer 의 너비를 994px 로 수정
- 수정부분 2 : <div style="width:990px;"> 을 <div style="width:996px;"> 로 수정
- 아래 -
<!DOCTYPE html PUBLIC "-//W3C//DTD XHTML 1.0 Transitional//EN" "http://www.w3.org/TR/xhtml1/DTD/xhtml1-transitional.dtd">
<html xmlns="http://www.w3.org/1999/xhtml">
<head>
<title>div 태그로 레이아웃 설정</title>
<style type="text/css">
body {
text-align:center;
width:100%;
height:100%;
}
#header {
width:994px;
height:100px;
background-color:Yellow;
border:groove 1px silver;
padding:0px 0px 0px 0px;
margin:0px 0px 10px 0px;
}
#left {
width:160px;
height:200px;
background-color:Yellow;
border:groove 1px silver;
padding:0px 0px 0px 0px;
margin:0px 10px 0px 0px;
float:left;
}
#content {
width:650px;
height:200px;
background-color:Yellow;
border:groove 1px silver;
padding:0px 0px 0px 0px;
margin:0px 0px 0px 0px;
float:left;
}
#right {
width:160px;
height:200px;
background-color:Yellow;
border:groove 1px silver;
padding:0px 0px 0px 0px;
margin:0px 0px 0px 10px;
float:left;
}
#footer {
width:994px;
height:100px;
background-color:Yellow;
border:groove 1px silver;
padding:0px 0px 0px 0px;
margin:10px 0px 0px 0px;
float:left;
}
</style>
</head>
<body leftmargin="3" marginwidth="3" topmargin="3" marginheight="3">
<div id="header">Navigator</div>
<div style="width:996px;">
<div id="left">Left</div>
<div id="content">Content</div>
<div id="right">Right</div>
<div id="footer">Footer</div>
</div>
</body>
</html>
- 끝 -
<궁금증 2에 대한 답>
1. ' Black' 님이 원하는 페이지를 제작하는 방법은 여러가지가 있지만 제가 애용하며 일반적으로 많이 사용하는 방법의 소스를 아래와 같이 작성합니다.
2. 참고로 ' Black' 님이 원하는 페이지와 유사하게 제작 중인 사이트를 알려드립니다. (현재 제가 제작 중인 사이트로 99.9% 완성된 사이트입니다.)
- 사이트주소 : http://egreenworld.co.kr/
- 아래 예제 미리보기 : http://egreenworld.co.kr/GNU/sirH/sir_black.html (2012년 4월 30일 까지만 게시할 예정입니다.)
- 아래 -
<!DOCTYPE HTML>
<html>
<head>
<meta charset="utf-8">
<title>Div 박스 정렬 연습</title>
<style type="text/css">
#AAA {width: 970px; height:120px; background-color: #FC0; font-size: 13px;font-weight: bold; text-align: left; margin: 0 auto; padding: 5px 0 0 20px;}
#wrap {width: 990px; height:500px; margin :0 auto; position:relative; background-color: #09C;}
#header {width: 990px; height: 100px; margin :0; float:left; background-color: #9C0;}
#left {width: 160px; height: 100px; margin :0 10px 0 0; float:left; background-color: #F60;}
#content {width: 650px; height: 100px; margin :0 10px 0 0; float:left; background-color: #FC3;}
#right {width: 160px; height: 100px; margin :0 auto; float:left; background-color: #F60;}
#wingleft {width: 50px; height: 100px; position: absolute; background-color:#9C0; left: -60px; top: 100px; z-index: 2;}
#footer {width: 990px; height: 100px; margin :0 auto; float:left; background-color: #CC3;}
#wingright {width: 50px; height: 100px; position: absolute; background-color:#9C0; left: 1000px; top: 100px; z-index: 1;}
</style>
</head>
<body>
<div id="AAA">
<p> 이 AAA 박스는 설명글 작성을 위해 임시로 만든 것이니 실제 응용을 하시려면 AAA 박스를 제거하여 응용하시기 바랍니다.</p>
<p>각 박스마다 색상을 넣은 것은 비교와 작업의 편의를 위한 것으로 제가 박스 레이아웃을 구성할 때 박스의 위치 및 크기의 변화를
쉽게 구별해 보기위해</p>
<p>박스 마다 다른 색상을 넣고 작업을 하곤합니다. 그래서 이렇게 박스마다 각각의 색상은 넣었음을 참고하시기 바랍니다.</p>
</div>
<div id="wrap">
<div id="header">header</div>
<div id="wingleft">wingleft</div>
<div id="left"> left</div>
<div id="content">content</div>
<div id="right">right</div>
<div id="wingright">wingright</div>
<div id="footer">footer</div>
</div>
</body>
</html>
- 끝 -
바쁘실텐데 모두들 도움 말씀 정말 감사합니다.
주신 소스를 그대로 응용하여 차근차근 공부를 하였습니다.
제가 원하던 답을 얻었습니다.
아래는 가르려주신 소스대로 올린 html 파일입니다.
기존 소스 http://www.teamif.kr/css1.htm
cshop 님 http://www.teamif.kr/css2.htm
지운아빠 님 http://www.teamif.kr/css3.htm
아이존 님 http://www.teamif.kr/css4.htm
飛展 님 http://www.teamif.kr/css5.htm
다시 한번 감사의 인사를 드립니다.
모두들 건강하시고, 좋은 일만 가득하세요~
게시글 목록
| 번호 | 제목 |
|---|---|
| 20097 | |
| 20095 | |
| 20093 | |
| 20092 | |
| 20091 | |
| 20089 | |
| 20086 | |
| 20085 | |
| 20084 | |
| 20083 | |
| 20082 | |
| 28358 | |
| 20081 | |
| 20079 | |
| 20078 | |
| 20077 | |
| 20076 | |
| 20075 | |
| 20074 | |
| 20073 |
PHP
php환경 변수 출력 입니다.
|
| 20072 |
PHP
PHP팁 (보안 등) 입니다.
|
| 20071 |
PHP
문자열 자르는 함수 입니다.
|
| 20070 | |
| 20069 | |
| 8148 | |
| 20057 |
정규표현식
파싱 예제입니다.
11
|
| 8141 | |
| 24669 | |
| 20056 | |
| 8138 | |
| 28353 | |
| 20055 | |
| 20054 | |
| 20053 | |
| 20052 | |
| 20051 | |
| 20050 |
JavaScript
지난 시간 경과시간 페이스북 sns 처럼 보여주기 javascript 버전
|
| 20047 | |
| 20046 |
PHP
php환경맞춤 부분 입니다.
|
| 20045 | |
| 20044 | |
| 8111 | |
| 20043 | |
| 20042 | |
| 20040 | |
| 20039 |
JavaScript
구글 맞춤검색 설정 방법, google custom search
|
| 20037 | |
| 20036 | |
| 20035 | |
| 20027 |
MySQL
1000만건 게시판에 도전합니다. 두번째
7
|
| 8107 | |
| 31022 | |
| 20026 |
MySQL
Join 을 이용한 delete
|
| 20025 | |
| 20024 | |
| 20023 |
PHP
미리 정의된 변수들 입니다.
|
| 28350 | |
| 20022 | |
| 20018 |
MySQL
1000만건 게시판에 도전합니다. 첫번째
3
|
| 20017 |
MySQL
select 해서 바로 insert하기
|
| 8099 | |
| 20016 | |
| 20013 | |
| 8090 | |
| 20012 | |
| 20010 | |
| 20009 | |
| 19998 |
PHP
텔레그램 푸쉬 봇
10
|
| 28348 | |
| 28347 | |
| 19997 | |
| 19996 |
OS
파일분할 분할압축 해제
|
| 19995 |
웹서버
리눅스백그라운드실행
|
| 19993 | |
| 8087 | |
| 8065 | |
| 19990 | |
| 8063 | |
| 8056 | |
| 19989 | |
| 19988 | |
| 19987 | |
| 19986 | |
| 19985 | |
| 19984 | |
| 19983 | |
| 19982 |
MySQL
mysql에서 boolean 타입 사용하기
|
| 8054 | |
| 19981 | |
| 19980 | |
| 19979 |
MySQL
mysqladmin 상태 모니터링
|
| 19978 | |
| 19977 | |
| 19976 |
웹서버
리눅스 프로세스 검사, 조회
|
| 19975 |
웹서버
리눅스에서 네트워크 상태 보기
|
| 19974 |
웹서버
리눅스 80 포트 방화벽 열기
|
| 19973 | |
| 19972 |
MySQL
Mysql Table 일괄 삭제 방법.
|
| 19971 | |
| 19970 |
댓글 작성
댓글을 작성하시려면 로그인이 필요합니다.
로그인하기